Installation
Weather Station is the primary public install path for Bellweather plugins. It handles downloads, updates, and licensing in one place. If you prefer a standard package install, direct macOS installers remain available as a secondary path. Barometer for Windows is available as a signed VST3 installer and a direct CLAP archive. Supported formats: VST3 and CLAP.
Install via Weather Station
Weather Station is the default Bellweather workflow for downloading, installing, updating, and managing plugins.
Video steps
- Download Weather Station for your Mac.
- Complete the Weather Station package installer.
- For an installed plugin, open More options and choose Reinstall.
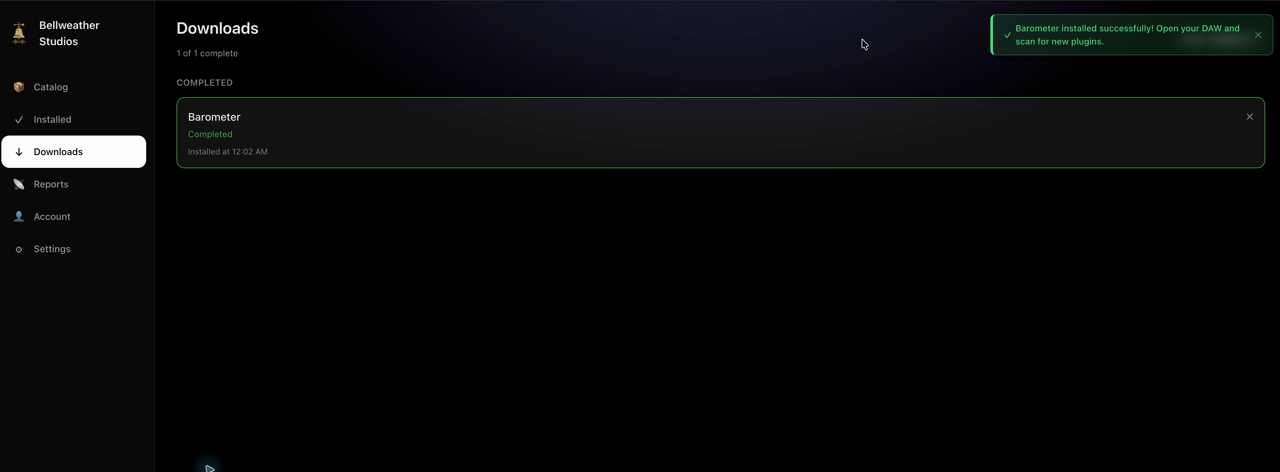
- Wait for Downloads to show Completed.
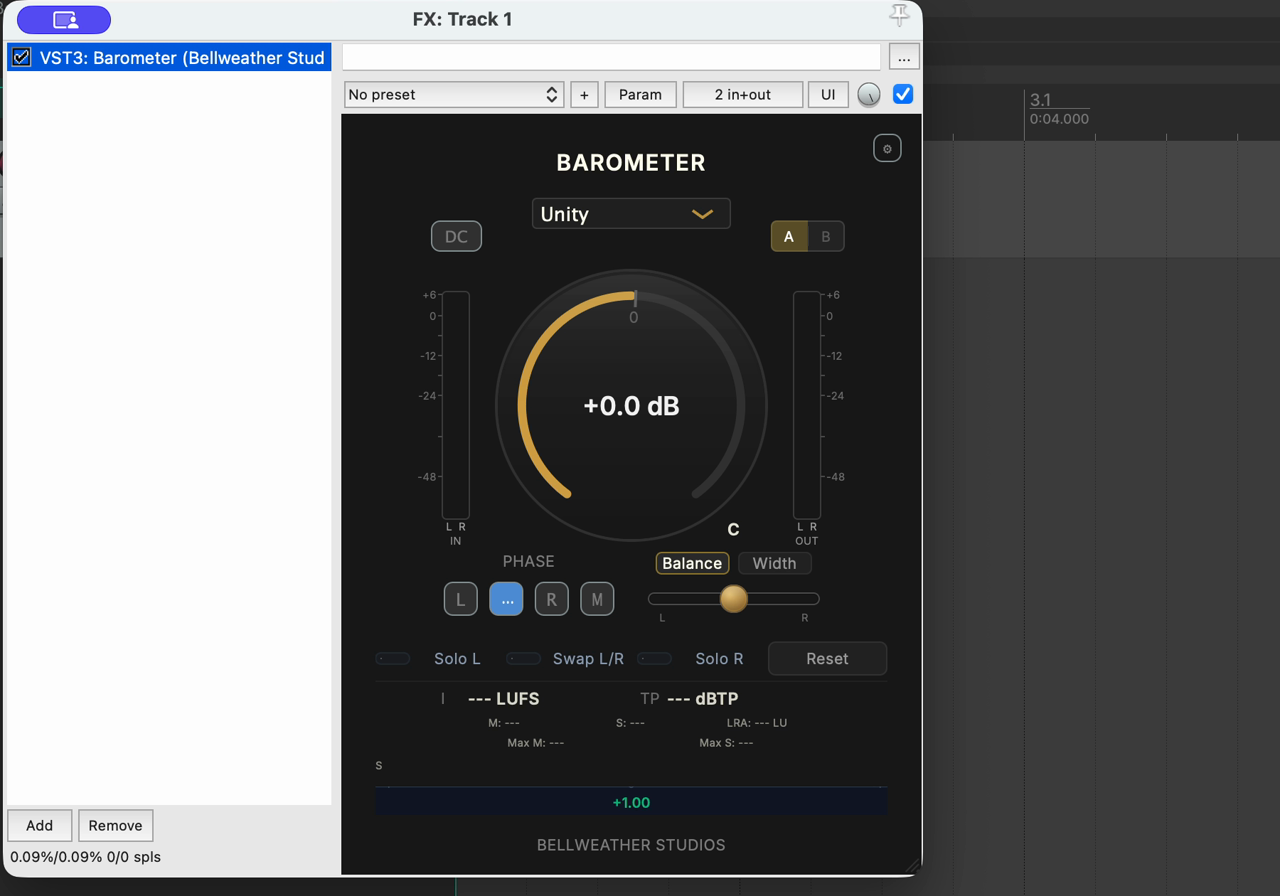
- In REAPER, add FX to a track and search for Barometer.
- Open Barometer on the track.
- 1
Download Weather Station
Weather Station is a free desktop app that manages all your Bellweather Studios plugins. Go to bellweatherstudios.com/downloads and choose the Apple Silicon or Intel build for your Mac. Not sure which? Click the Apple menu, then About This Mac.
- 2
Install Weather Station
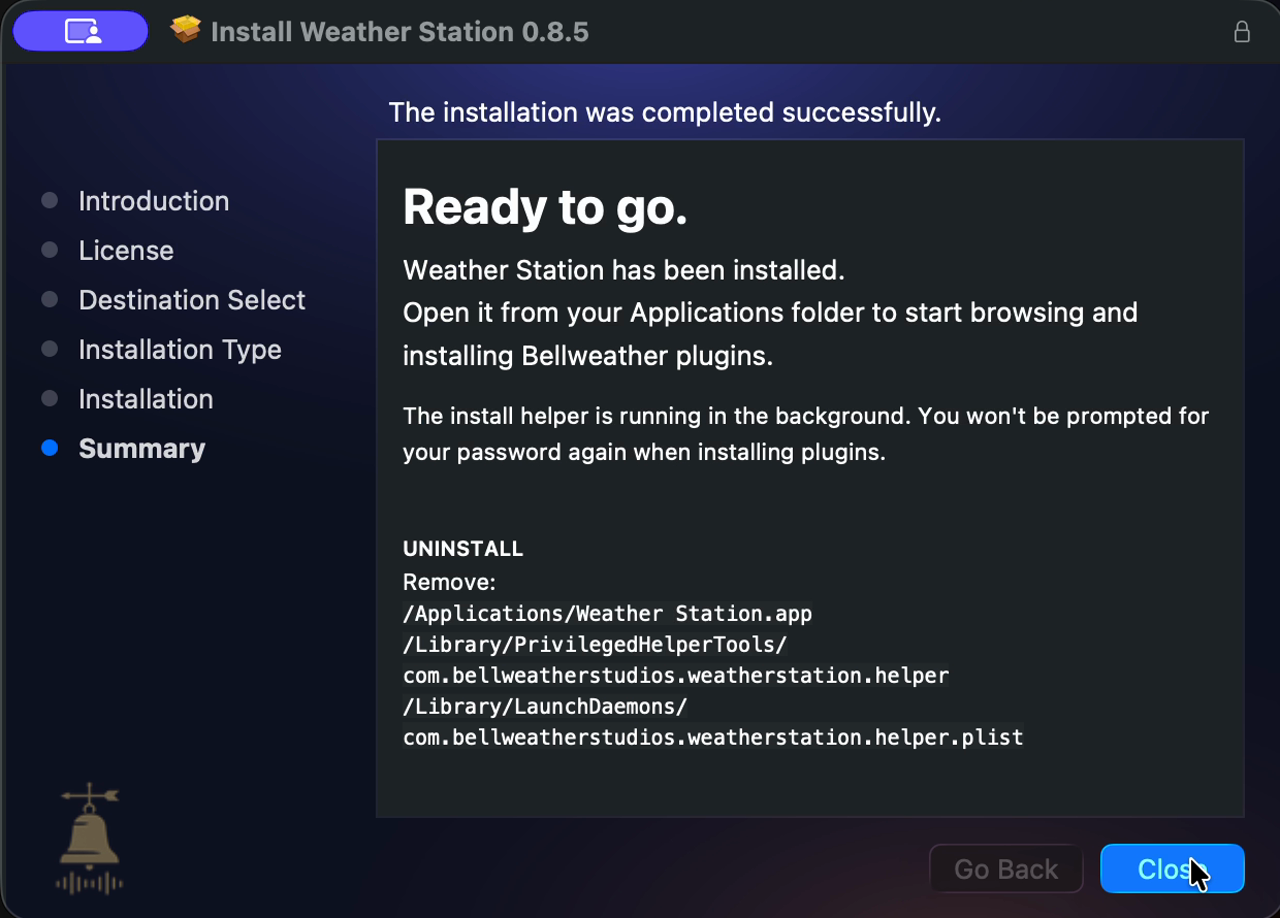
Open the downloaded macOS package and follow the installer prompts. When installation completes, open Weather Station from Applications.
- 3
Sign in or create an account
Launch Weather Station and choose Sign In. Complete sign-in or create an account in your browser, then allow the browser to open Weather Station when prompted.
- 4
Browse the Catalog
Go to the Catalog tab. You will see every available Bellweather plugin along with its current version and install status.
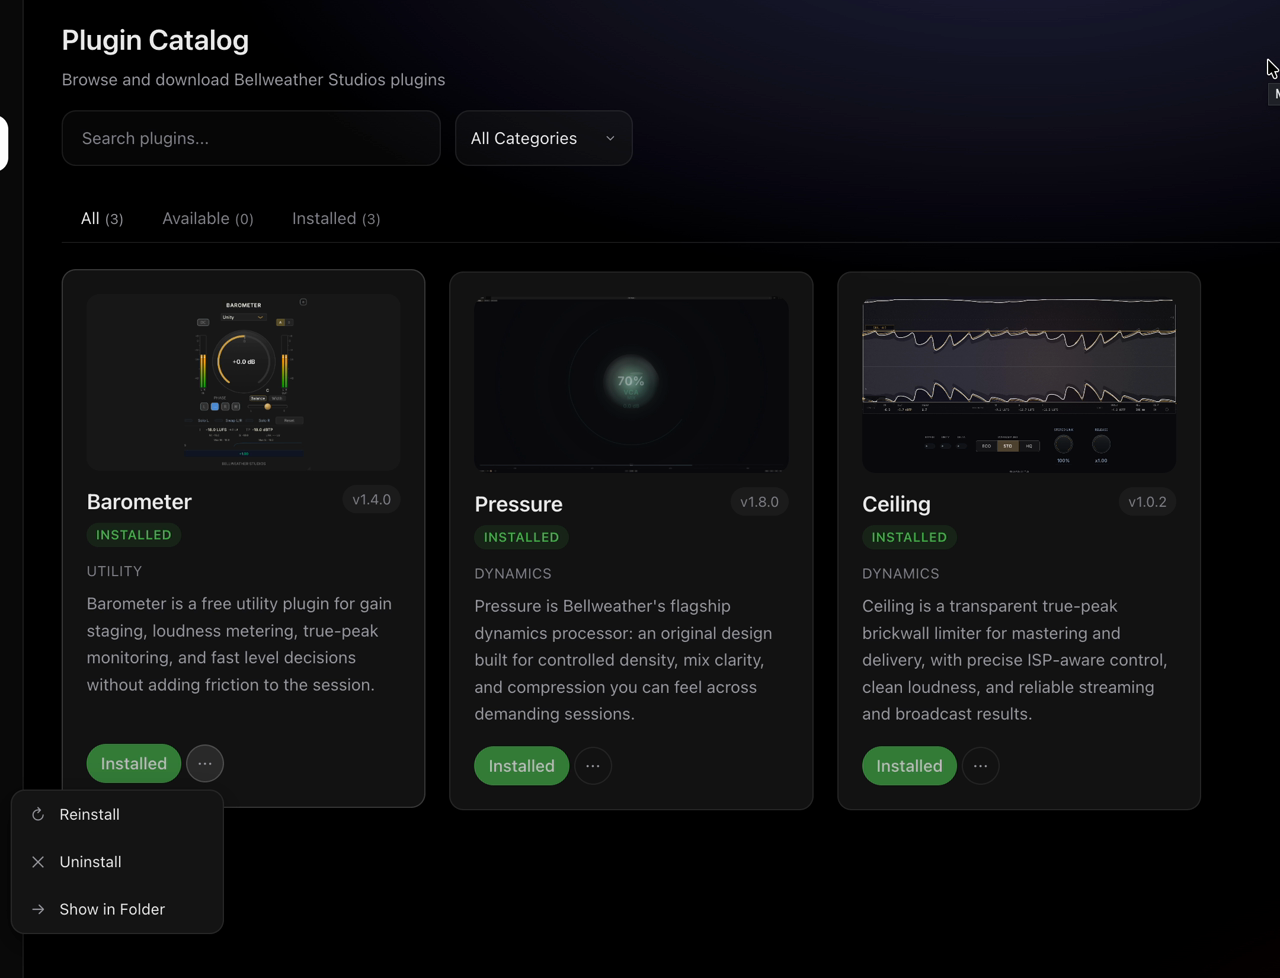
For an installed plugin, choose More options, then Reinstall. - 5
Click Install
Click Install next to the plugin you want. Weather Station downloads and installs VST3, AU, AAX, and CLAP formats to the standard macOS plugin folders. You may be asked for your macOS password.
- 6
Open your DAW
Launch your DAW. The plugin appears in your insert or effect list. If it does not show up, run a plugin rescan from your DAW preferences.
Install via Package Installer
Use a standard macOS installer when you prefer a package install outside the Weather Station workflow. It still handles format placement automatically.
- 1
Download the plugin installer
Sign in to your Bellweather account, open Your Products, and download the installer for your product. Purchase confirmation links return you to the same account-owned product.
- 2
Run the installer
Open the downloaded package and follow the prompts. The installer places VST3, AU, AAX, and CLAP formats in the standard macOS plugin folders automatically. You may be asked for your macOS password.
- 3
Rescan in your DAW
Open your DAW and run a plugin rescan. Most DAWs scan automatically on launch. If the plugin does not appear, check the troubleshooting section for per-DAW instructions.
- 4
Activate your license
Open the plugin in your DAW. On first launch it will prompt for your license key when the product requires one. Paste the key from your purchase email and click Activate.
Weather Station on Windows and Linux
Use the current download for your operating system from the Downloads page. App availability and plugin availability are separate; check Available Downloads below before installing a plugin.
Windows
- Download the Windows installer from the official Downloads page and open it. Follow its installation prompts.
- If Windows asks for permission, check the publisher before continuing. If the publisher is unknown or the file is flagged as malware, stop and contact support. Do not turn off Windows security.
- Open the installed Weather Station app and choose Sign In. Complete sign-in in the browser and allow it to open Weather Station when prompted.
- Confirm that the app shows your account. Install an available plugin from Catalog, wait for completion in Downloads, then reopen your DAW and scan for the installed format.
Linux
- Choose the Linux package offered on Downloads. The AppImage is a runnable application; the DEB package is for systems that support Debian packages.
- For AppImage, use your file manager's Properties or Permissions to allow the downloaded file to run as a program, then open it. Labels vary by desktop. For DEB, open the file with your system's package installer and follow its prompts.
- Launch Weather Station from your normal graphical desktop session. If your desktop password store asks to be unlocked, use its local prompt. Do not launch the app as root or disable secure credential storage.
- Choose Sign In and complete the browser flow. Confirm your account appears in Weather Station before installing a supported plugin. If the browser cannot return to the app, use the troubleshooting link below.
Expected result: the app shows your signed-in account, Downloads confirms installation, and the plugin opens in a compatible DAW. If launch, sign-in, or installation fails, record the exact message and follow Weather Station troubleshooting. On Linux, include your distribution and desktop environment. Do not use the macOS Keychain repair on either system.
Install Barometer on Windows
Barometer for Windows is available as a signed VST3 installer and a direct CLAP archive. Supported formats: VST3 and CLAP. A new VST3 installer can still show an uncommon-download warning while Microsoft builds reputation for the file. The steps below cover that installer.
- 1
Download Barometer for Windows
Sign in to your Bellweather account, open Your Products, and download Barometer for Windows. Microsoft Edge may flag a new release as an uncommon download while its reputation is still building.
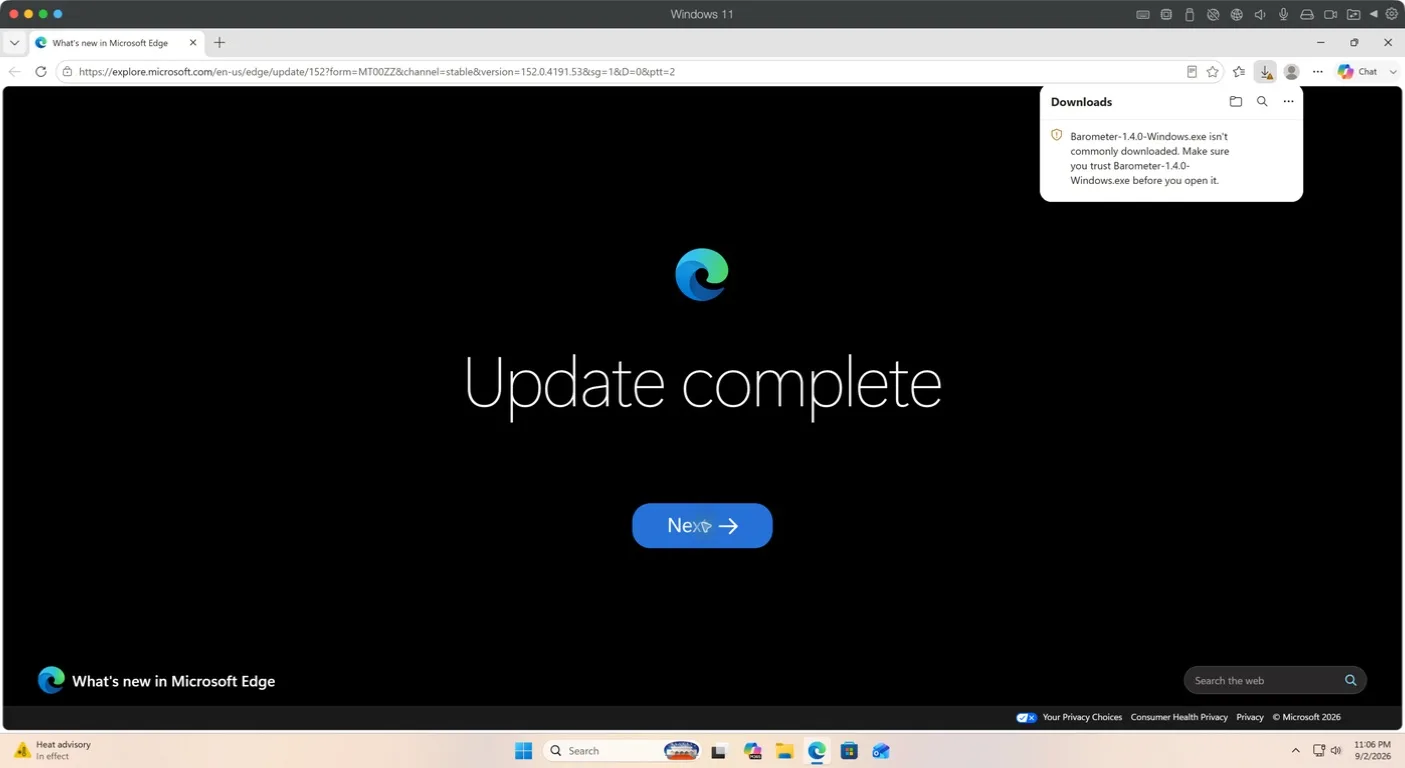
- 2
Keep the verified installer
Open the download menu, choose Keep, then choose Keep anyway. Confirm that the file name starts with Barometer and that Windows shows Keith Hetrick as the publisher.
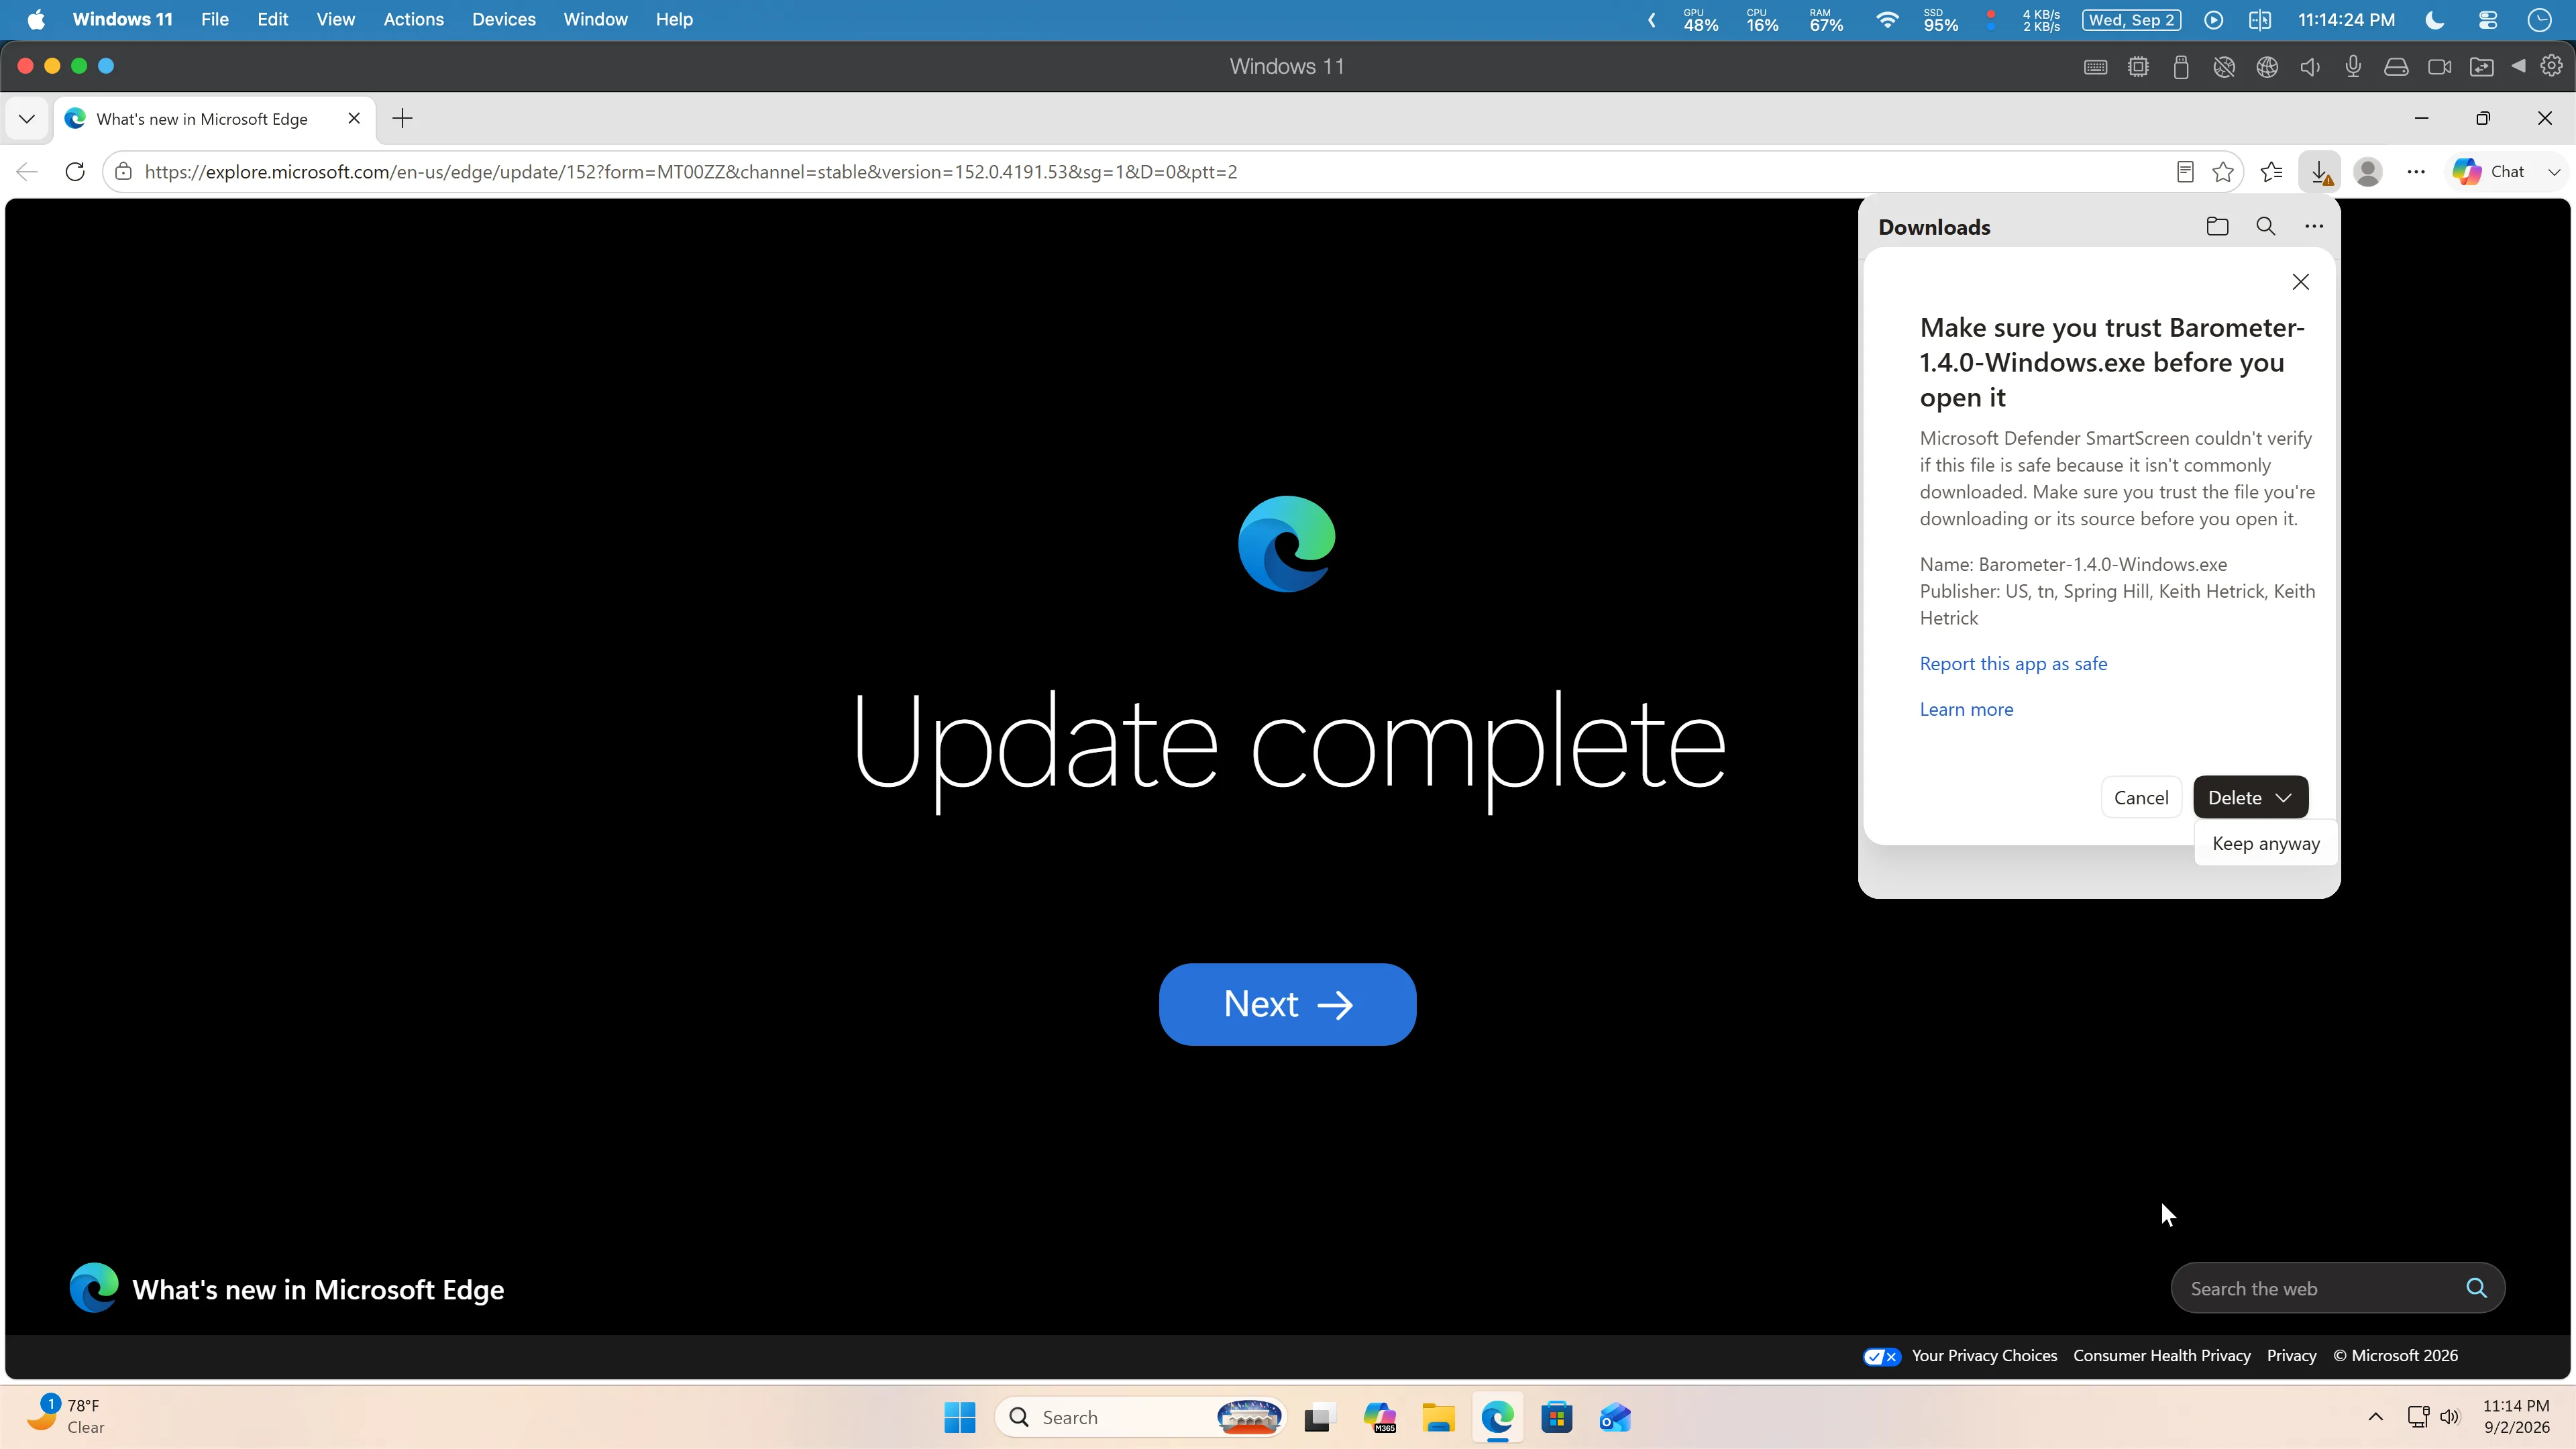
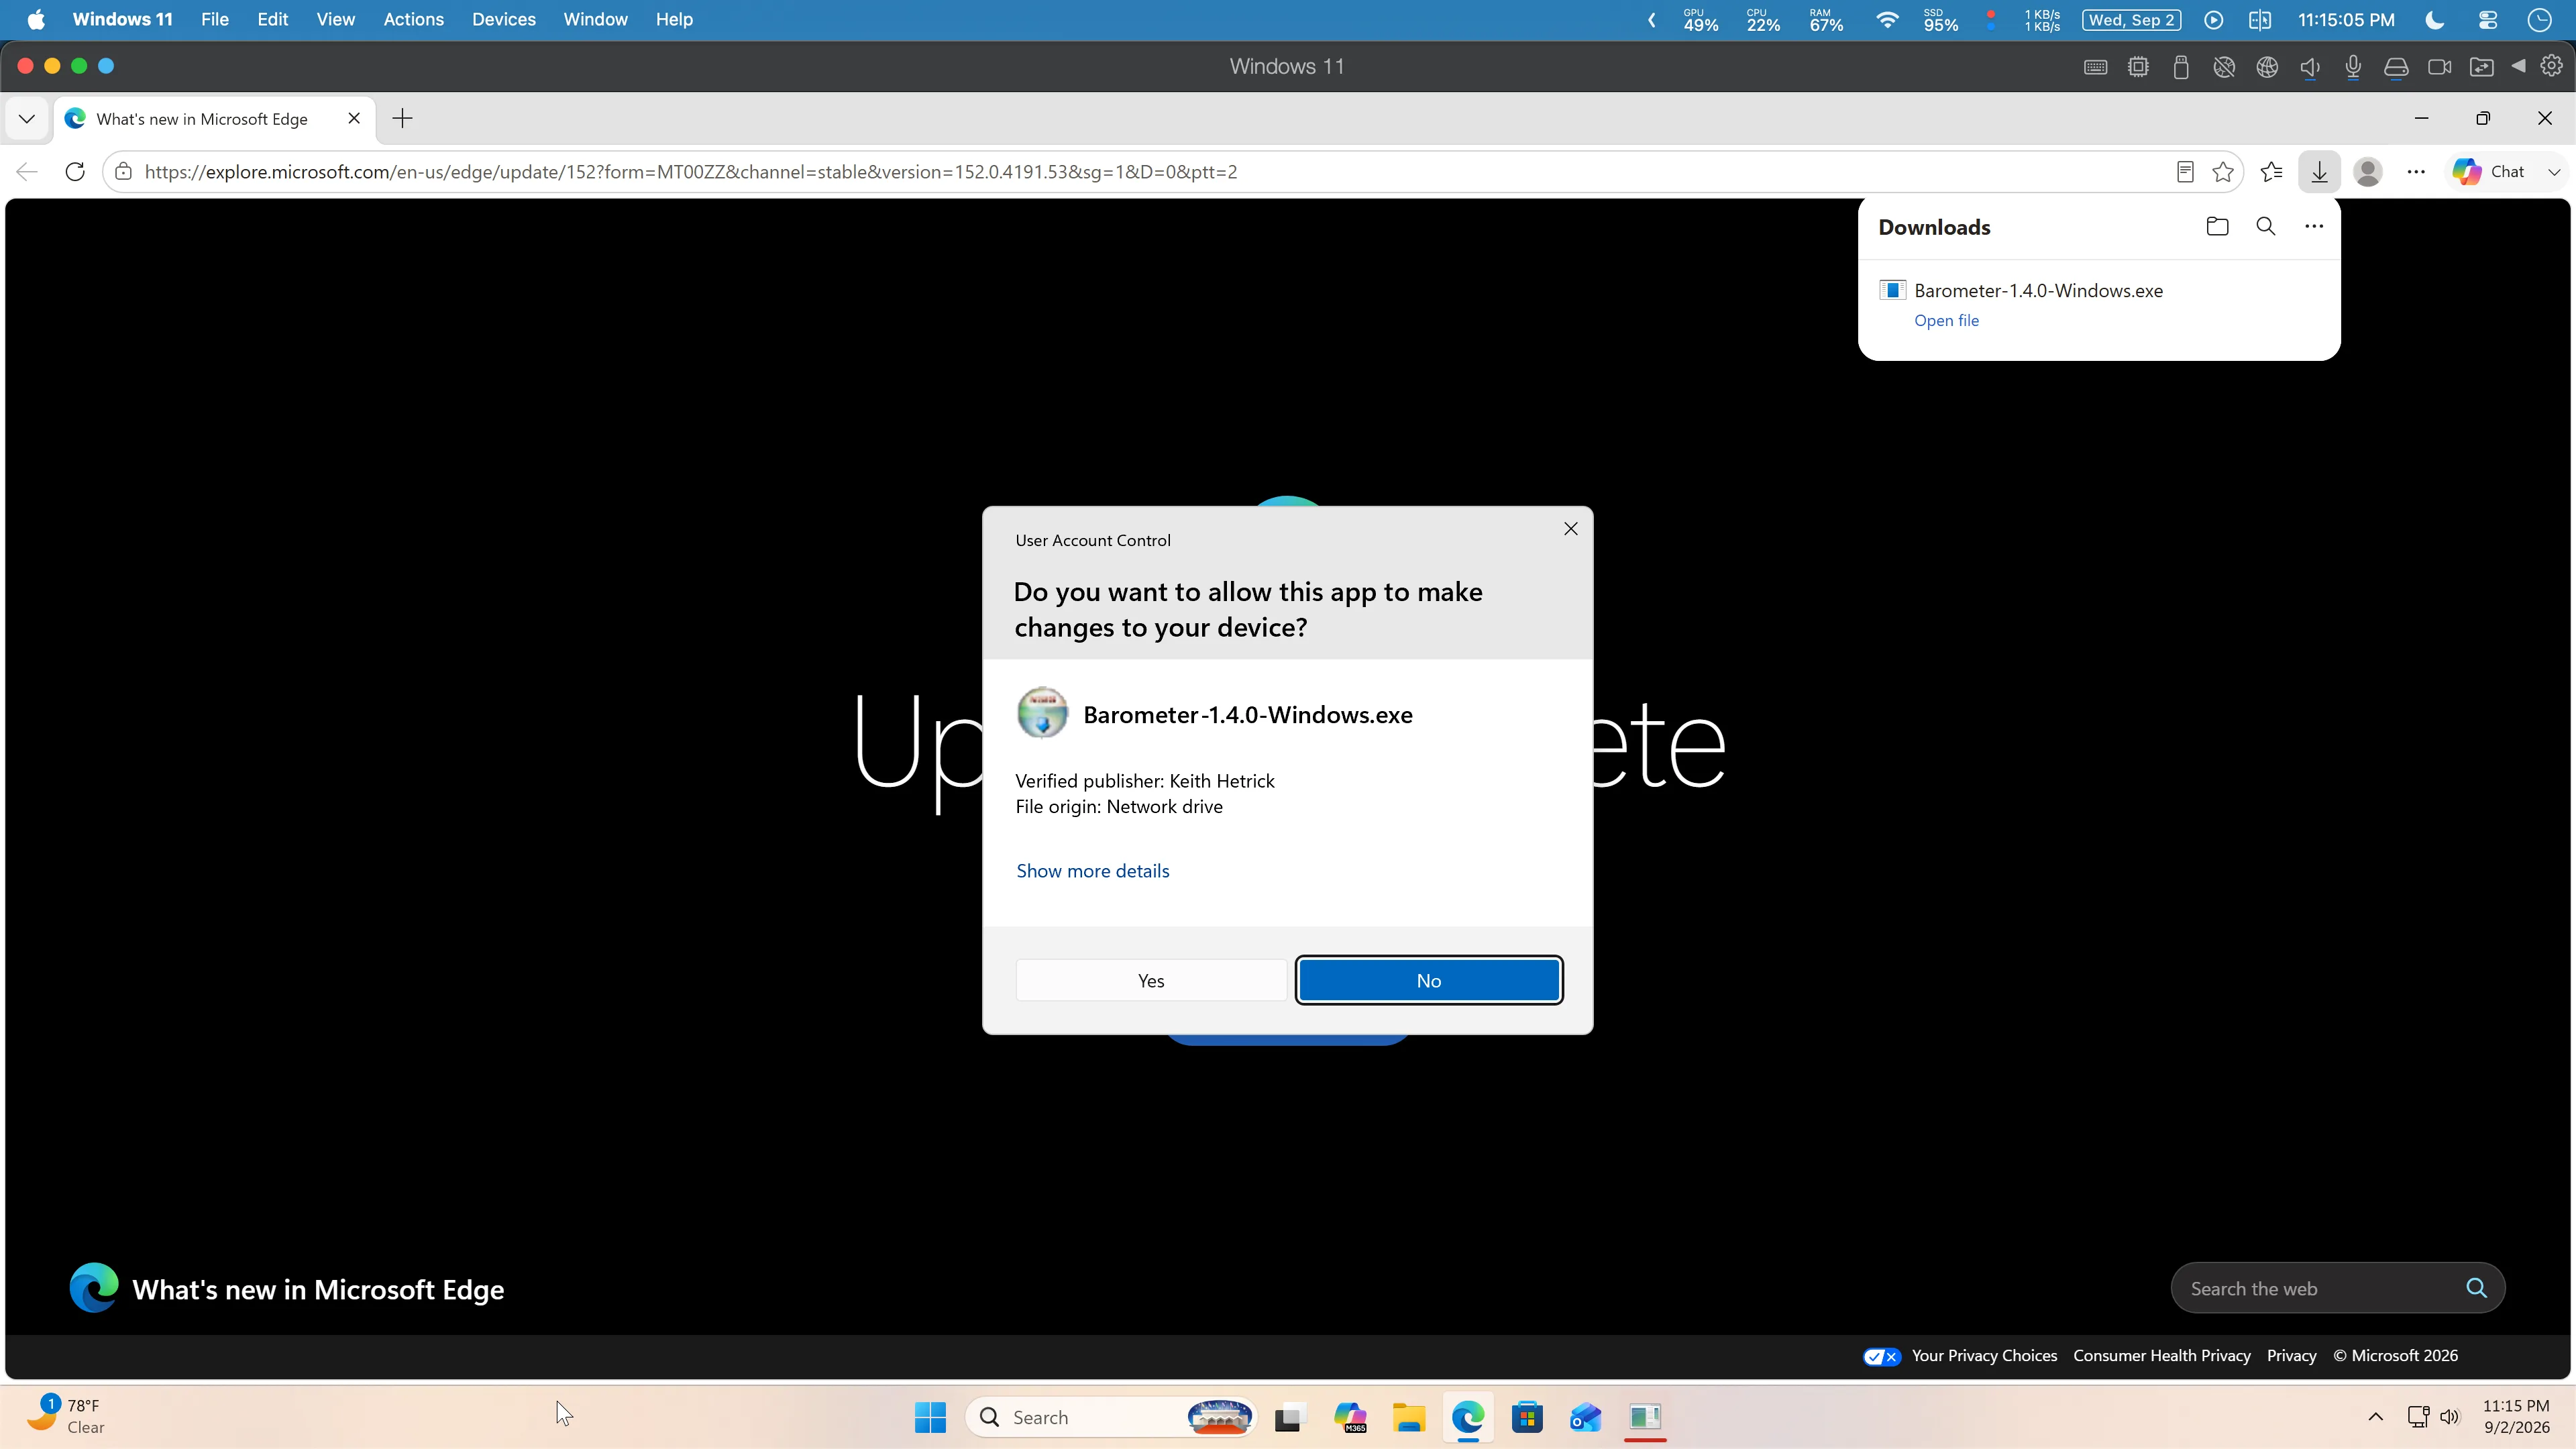
- 3
Confirm the verified publisher
Open the installer. In User Account Control, verify that the publisher is Keith Hetrick before choosing Yes.
- 4
Install the VST3
Follow the installer prompts and leave the VST3 component selected. The installer places Barometer in the standard 64-bit Windows VST3 folder.
- 5
Finish and scan in your DAW
Complete the installer, open your DAW, and run a VST3 rescan if Barometer does not appear automatically.
For the direct CLAP download, extract Barometer.clap from the archive into C:\Program Files\Common Files\CLAP\, then rescan CLAP plugins in your host. Administrator permission may be required.
Activation
Installed via Weather Station
Sign in to Weather Station with your purchasing account. Open Account and check Your Licenses. If a product is missing, confirm the account and choose Refresh Licenses. Choose Manage beside a product to review its activated machines. If the installed plugin still asks for activation, contact support with its exact message.
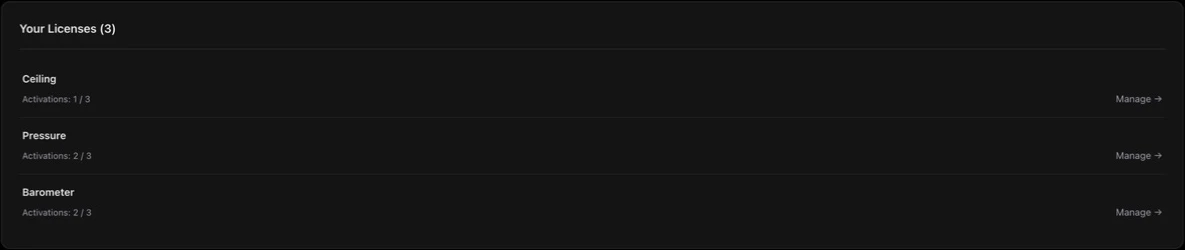
For license transfers, multiple machines, and offline use, see Activation & Licensing.
Available Downloads
System Requirements
macOS Security
- •Download installers from Bellweather Studios. A normal first-open confirmation is different from a warning that an app is damaged or contains malware.
- •For a normal downloaded-app confirmation, check the app name and source before choosing Open.
- •If macOS blocks an installer or cannot verify it, stop and contact support with the exact message. Do not disable macOS security protections or bypass a malware warning.
Install Paths
Plugins are always installed to these standard system paths. Custom install locations are not supported.
DAW Plugin Scanning
In Weather Station, open Settings to check Plugin Formats and use the Plugin Folders buttons to locate the installed files. Then follow the scanning instructions for your DAW below.
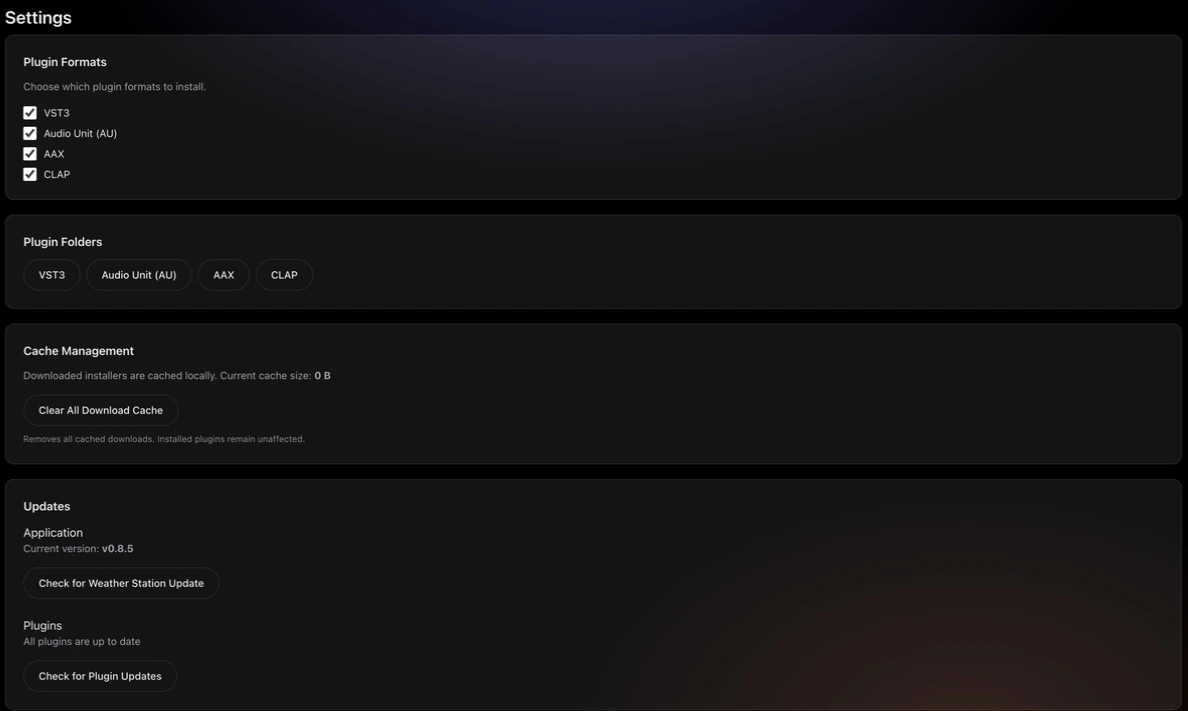
Format note: Logic Pro uses AU only. Pro Tools uses AAX only. REAPER and Bitwig also support CLAP. Most other DAWs use VST3 (also support AU) on macOS. Weather Station installs every available macOS format. Barometer for Windows supports VST3 and CLAP.
Logic Pro (AU only)
Logic scans automatically on launch. If the plugin does not appear, go to Logic Pro, then Settings, then Plug-in Manager, then Reset & Rescan. If Logic shows a validation error, open Terminal and run auval -v aufx BWxx BWst to check. Contact support with the output.
Ableton Live (VST3 or AU)
Go to Preferences, then Plug-Ins, then enable VST3 or AU. Click Rescan.
Pro Tools (AAX only)
Restart Pro Tools. It scans for new AAX plugins on launch. For issues, verify the plugin exists in /Library/Application Support/Avid/Audio/Plug-Ins/.
Cubase / Nuendo (VST3)
Go to Studio, then Studio Setup, then VST Plug-in Manager, then click Rescan All.
Reaper (VST3, AU, or CLAP)
Go to Options, then Preferences, then Plug-Ins, then VST, then click Re-scan. Reaper also discovers CLAP plugins from the standard CLAP directory automatically.
FL Studio (VST3)
Go to Options, then Manage plugins, then click Start scan.
Studio One (VST3 or AU)
Go to Studio One, then Options, then Locations, then VST Plug-Ins. Click Reset Blacklist, then Rescan.
Bitwig (VST3 or CLAP)
Go to Settings, then Plug-Ins, then click Rescan. Bitwig also scans the standard CLAP folder.